Course Overview.
Overview of the course.
The goal of this course is to help you write multi-platform GUI applications. They could be executed in any platform and even ported to embedded systems like Rasberry or Arduino.
We will use the Qt library which is written in C++.
Qt

Qt is not a programming language on its own. It’s a framework written on C++. A preprocessor MOC (Meta-Object Compiler) is used to extend the C++ language with features like signals and slots. Before the compilation step, the MOC parses the source files written in Qt-extended C++ and generates standard compliant C++ sources from them. Thus the framework itself and applications/libraries using it can be compiled by any standard compliant C++ compiler like Clang, GCC, ICC, MinGW and MSVC.
What you should learn
The goal of this course it to teach you the basics of creating GUI applications using the C++14 standard. Since Qt make a heavy use of C++ concept, we will focus in the first part to recover some of advanced OOP concepts like:
- Inheritance.
- Polymorphism and Abstraction.
- Templates and const correctness.
Once we master those concept, we will move to create our fist applications. We will start by a simple dialogs using inheritance and meta-programming concept of signals and slots.


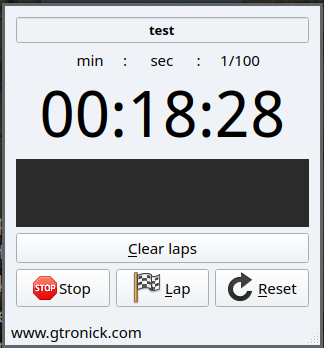
We will dive deeper into the set of Qt Widgets and get used to most used ones. As a homework, you’ll write a chronometer diaglog that show either a running or elapsed time.
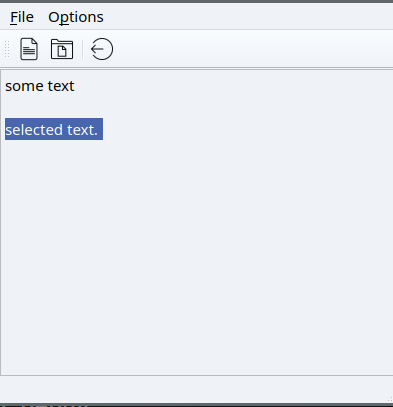
Finally, we will present all the essential components for a Qt Application with a status bar, and tool bar and a main widget. In order to master those concept, you’ll write your own basic Text Editor with some basic functionalities such as sort or search.
Final projects
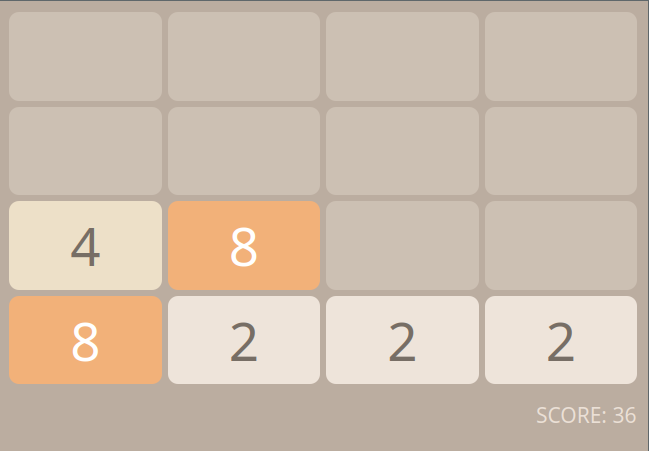
As a final project, you can choose between the two following projects.
- A car dashboard

- The 2048 Game:
First projects
In this section, we will show some basic functionalities of the Qt library and some of its containers replacements.
Qt version
In this simple hello world like program, we will write a simple program to
print the QT version of your installation. We also show how to compile this
program using either the raw linking abilities of your compiler or (much easier)
uusing the qmake tool to generate the compiling commands for you.
- First, we will create a simple program
version.cppwith the following content:
#include <QtCore>    // Core function for Qt
#include <iostream>

int main()
{
    //printing Qt version
    std::cout << "Your Qt version is : " << qVersion() << std::endl;
}
-
In order to compile to program, we could manually link the Qt libraries using
g++ -o version version.cpp -I/usr/include/x86_64-linux-gnu/qt5/QtCore \
  -I/usr/include/x86_64-linux-gnu/qt5 -L/usr/lib/qt5 -lQt5Core -fPIC
the -I/path/ is used to show the compiler the path of a given library and
added to the linker.
- A much better and easer way, is to use build process. Qt comes with its own building process called qmake. It automates the generation of Makefiles so that only a few lines of informatioon are needed to create each Makefile.
Hence, in order to compile this program, we could write:
qmake -project # command to generate a project config file
This will generate a version.pro that contain the meta information about
your project. Once this file is generated, we can create a Makefile to
compile the program using:
qmake # Generate the Makefile in order to compile the program
Once the Makefile is generate, we can compile the program by simply calling the make command
make # compile the program version.cpp
Empty GUI
In order to show options and manipulations of the qmake file, we will create an empy Qt application (with no widgets).
So we will start by writing the main program (don’t worry if you don’t understand its components, we will come back and explain each one of them).
#include <QApplication>
#include <QWidget>

int main(int argc, char *argv[])
{
    //Creating the main application
    QApplication app(argc, argv);

    //Creating a simple widget
    QWidget window;
    window.resize(400, 500);
    window.setWindowTitle("Empty application");
    window.show();

    // Entering the infinite loop
    return app.exec();
}
We generate the qmake project file by qmake -project. But for this program, we
need to instruct Qt to include the widgets components.
######################################################################
# Automatically generated by qmake (3.1) Sun Sep 5 09:40:11 2021
######################################################################

TEMPLATE = app
TARGET = empty
INCLUDEPATH += .

DEFINES += QT_DEPRECATED_WARNINGS


# Input
SOURCES += empty.cpp

# Adding the widgets components
QT += widgets
You can then configure the program by make:
Qt High level classes
QT provides high level replacement for the classical containers like arrays, string and lists. In this seciton, we show some advanced for these classes.
Strings
QT5 has a QString class for working with strings. It is very powerful and has
several methods. A QSTring is a collectin of QChar.
In this example, we illustrate the following methods:
- append and prepend.
- toUpper and toLower.
- build String.
- Splitting.
QString can add content to an string by the two methods append and
prepend. Also, unlike the STL library strings, we can convert the whole
string into lower or upper state by a single call.
#include <QTextStream>

int main(int argc, char *argv[])
{

    //QTestStream to print string (plays the role of cout)
    QTextStream out(stdout);

    //initiating a Qt String using uniform initializer
    QString simple { "random" };

    //printing the string
    out << simple << endl;


    //adding at the end
    simple.append(" Walk!");

    //adding at the beginning
    simple.prepend("The use of ");
    out << simple << endl;


    //converting to lower and uppper
    out << simple.toLower() << endl;
    out << simple.toUpper() << endl;
}
Another cool feature of QSTring is the ability to build string in C like
printf format. Each string could contains a set of placeholder that could
be replaced using the arg method.
To illustrate this concept, we will create a template to print server login information. The message will contain the user name and number of logs.
#include <QTextStream>

int main(int argc, char *argv[])
{
    QTextStream out(stdout);      // stream to print information


    //Creating the template
    QString message{ "User %1 tried to log %2 times" };


    //printing information with user (EUMF, 43)
    out << message.arg("EUMF").arg(43) << endl;


    // other instance
    out << message.arg("EIDIA").arg(12) << endl;


}
Another advanced method in this class is the the split methods which gives the
user a fast way to decompose the string into a set of token based on a
separator.
In the following example, we will decompose a message either by using the space or the comma separator.
#include <QTextStream>

int main(int argc, char *argv[])
{
    //Creating the main application
    QTextStream out(stdout);


    //complicated string
    QString message{ "token1 token2, token3 token4, token5 token6"};


    //spliting the message using the default space splitter
    for(auto token : message.split(QChar(' ')))
        out << token << "  ";
    out << endl;


    //spliting by a custom separator
    for(auto token : message.split(QChar(',')))
        out << token << "  ";
    out << endl;
}
The method
splitreturn a QStringList, which is a the list implementation in the Qt library.
For a set of extensive methods, we encourage to the reader to check the documentation page QtString
Containers
Qt offers a set of containers like:
- QVector
- QList
- QStringList
- QSet
- QHashMap
given the fact, that our knowledge of containers is reduced to vectors and lists, we will present the implementation of Qt of these two classes.
In the first example, we present the class QVector. It has the same API as
the STL container and can easily be cast to a standard vector.
#include <QTextStream>
#include <QVector>
int main(int argc, char *argv[])
{
    //Creating the main application
    QTextStream out(stdout);


    //Creating a vector using uniform initialisation
    QVector<int> nums{1, 2, 3, 4, 5};


    //printing the elements of the vectors
    for(auto value: nums)
        out << value << " ";
    out <<endl;


    //first and last value
    out << "first value : " << nums.first() << " Last value : " << nums.last() << endl;

    //filling change all the values to 1
    QVector<int> nums2(6);
    nums2.fill(1);

    //appending the nums2 to num1 using operator overloading
    nums += nums2;

    //We can also switch to STL vectors at any time
    auto num3 = nums.toStdVector();

}
In the second example, we use introduce the QList container and shows how it
is easy to incorporates the STL algorithm library with this container.
#include <QTextStream>
#include <QList>
#include <QList>
#include <algorithm>

int main(int argc, char *argv[])
{
    //out stream
    QTextStream out(stdout);

    //Creating doubly linked list
    QList<int> nums{4, 1, 3, 12, 20, 5};

    //printing the list
    out << "before sorting : ";
    for(auto value:nums)
        out << value << " ";
    out << endl;


    //linear search
    out << "Index of 3 is " << nums.indexOf(3) << endl;


    //We could work with nums as an STL container
    std::sort(nums.begin(), nums.end());


    out << "After sorting : ";
    for(auto value:nums)
        out << value << " ";
    out << endl;


    //Binary search  for 4
    auto value = 4;
    auto it = std::lower_bound(nums.begin(), nums.end(), value);
    out << "The value " << value << " is in index : " << std::distance(nums.begin(), it) << endl;

}