Creating Main Windows
Create full application by subclassing the QMainWindow class
The lecture will teach you how to create main windows using Qt. By the end, you will be able to build an application’s entire user interface, complete with menus, toolbars, status bar and as many dialogs as the application requires.
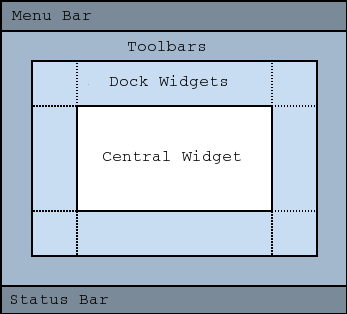
Table of Contents
- Table of Contents
- Introduction
- Subclassing QMainWindow
- QResources Management systems
- Creating menus and toolbars
- Setting up the status bar
- Central Widget
- Wrap up
Introduction
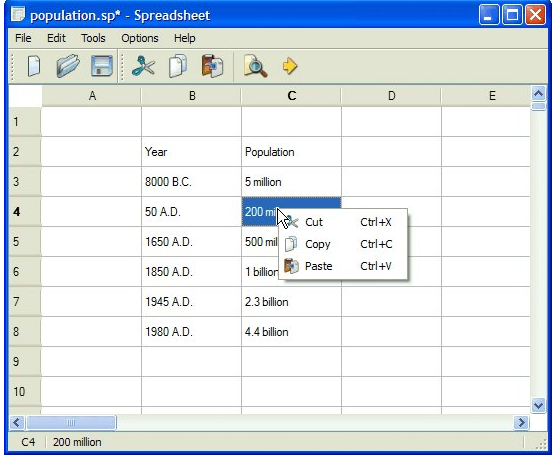
An application’s main window provides the framework upon which the application’s user interface is built. We will base our lecture on the Spreadsheet application show in the figure:
Behind most GUI applications lies a body of code that provides the underlying functionality. For example, code to read and write files or to process the data presented in the user interface. For this lecture we will focus on creating the main skeleton and live the functionality for next lecture.
Subclassing QMainWindow
The main component of an application is the
QMainWindow. Many of the techniques
we saw in the previous lectures for creating dialogs and widgets are relevant
for creating main windows, since both QDialog and QMainWindow inherit from
QWidget.
Generally mainWindow are creating using Qt Designer.
But for learning proposes, we will code everything to demonstrate how it’s done. If you feel overwhelmed you can follow the tutorial using Qt Designer.
So our, first setp is to create a Qt project (Yes now we are ready!). and choose the following steps:
- Qt Widgets Application
- Name the project
SpreadSheet - Choose
qmakeas configuration tool. -
Name the class
SpreadSheet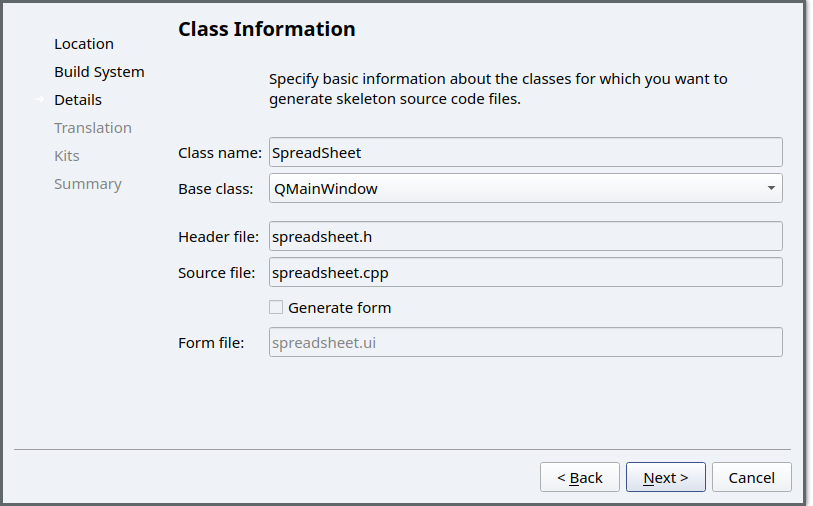 Configuration of the main project
 - Do not check the form. as we will be creating a Main Functional application.
- Finish the creation by selecting all the default remaining options.
If you checked the code for the spreadsheet.h, you’lle see that we are now
subclassing a QMainWindow.
#include <QMainWindow>

class SpreadSheet : public QMainWindow
{
    Q_OBJECT
public:
    SpreadSheet(QWidget *parent = nullptr);
    ~SpreadSheet();
};
Now our class contains only a Constructor/ Destructor, we will show step by
step how to add the components of our functional spreadsheet. But before to do
that let’s gather some resources (figures) that will serve us as Icons.
QResources Management systems
The Qt resource Management system is a platform independent mechanism for storing binary files in the application’s executable. The is useful if you’re application always needs a certain set of files such as:
- icons.
- translations files.
- local database.
The Qt mechanism system is based on tight cooperation between qmake and rcc (Qt resource compiler).
We will illustrate its use by adding the some icons to our application. So here a set of icons icons.zip . You’re strongly advised to use your own if you want.
Unzip all the images in the project folder.
- Go to your project and click add File
-
Select Qt Resource File as shown in the figure:
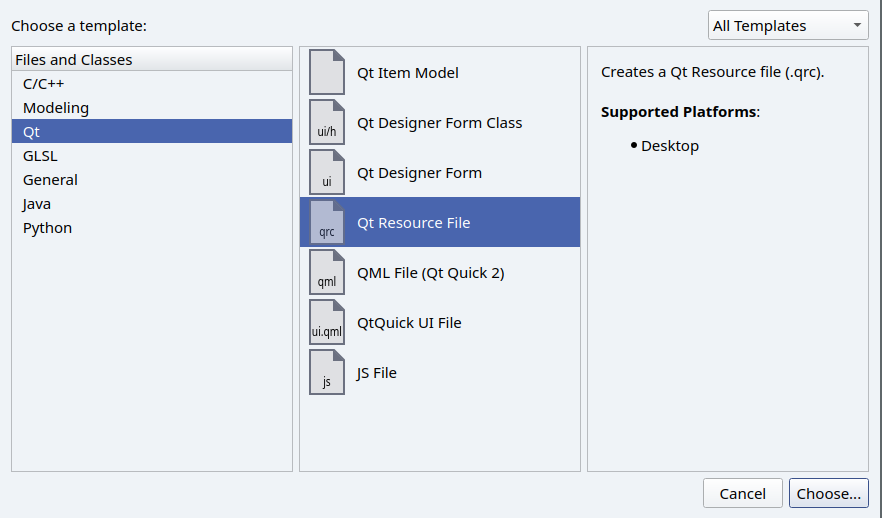 Dialog for adding a new resource file.
 - You’ll see a third section in your project called resources.
- Select the
icons.qrcfile and selectAdd existing files -
Select all the pictures, you want to add.
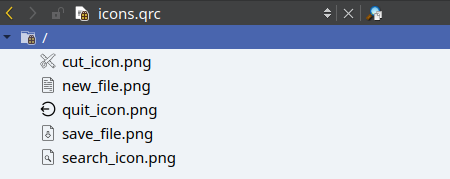 Set of added icons.
Now you’re set up. Let’s dive into the world of menus and actions.
Creating menus and toolbars
Before creating any application, you need to carefully think about it’s features and Functionality. This will give us a list of actions that the application could perform ( It’s ok to miss some of them as we could add them later, but at least think about the essential ones).
Exercice:
Let’s think about all the functionality of a SpreadSheet and list them:
- It should be able to create files.
- It can load or open new files.
- Of course we have to save spreadsheets.
- An application should be able to close itself (daaa)
- Our application need to Go to any cell.
- also Find a text.
- An application should give information about (which version, who’s the creator…)
- The list could goes on, but we will work with those options.
Actions
In applications many common commands can be invoked via menus, toolbar buttons, and keyboard shortcuts. Since the user expects each command to be performed in the same way, regardless of the user interface used, it is useful to represent each command as an action.
This mechanism is implemented in the QAction which offer a way to perform an action trough different ways.
For our case we will add the following actions to our application according to the previous discussion:
In the spreadsheet.h add the following declaration:
private:  //private method
   void createActions();   //Function to create all the actions

private:
QAction *newFile;      //Action to open a new file
QAction *openFile;     //Action to open a new file
QAction *saveFile;     // Save the file
QAction *quit;         //Operation close
QAction *about;        //About the application
Now for the implementation on spreadsheet.cpp, we will create each action with
its associated icons. To avoid repeatability, we will show only one action:
The general philosophy to create an action is:
- Create it’s icon with
QPixmap quitIcon("path"); - Create the action with its given icon:
QAction(icon, "text", parent); - Connect the action to it’s associated slot.
 connect(actionName, &QAction::trigerred,
          receiver, slot)
//Function to create all the widgets
void SpreadSheet::createActions()
{
   //Create the icon
   QPixmap quitIcon(":/quit_icon.png");

   // Create the action
   quit = new QAction(quitIcond, "&Quit", this);


    //Optional set the shortcut
    quit->setShortCut(tr("Ctrl+Q"));

   connect(quit, &QAction::trigerred,
   qApp, &QApplicaiton::exit);

}
Menus
Now we move on to Menu. Menus is way to group actions. They could be as pull down menu in the menu bar or as a standalone context menu.
In Qt, a menu regroup a set of predefined actions. The general approach for creating these menus in Qt is to::
-
Declare the menus in the header file
#include <QMenu> //dont forget to include the header QMenu *menuName; menuBar()->addMenu("name") -
Once they’re declared, we could add actions to them via the
menu->addAction(action*) -
Sometimes, it is useful to separate actions, we use the simple functional
menu->addSeperator()
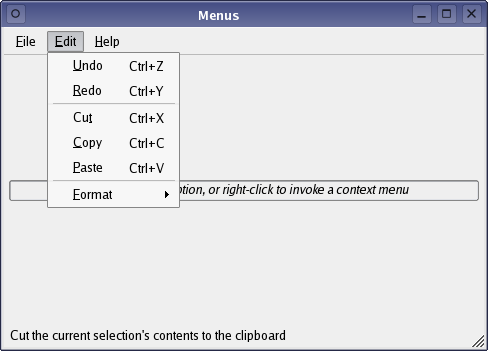
- Also in several situations a menu could have a sub menu. For example in the image below, the menu edit contains the submenu Format. In order to achieve that, we use the method
addMenu("name"). This method return a pointer to the submenu that we could manipulate to add some actions.
auto submenu = menu->addMenu("Format");
For our application, we will create a function createMenues to take care of
all the menus. Again, for simplicity the code was reduced to two menus. The
full code will be shared in the notes.
Here is the list of menus that we want to create:
void MainWindow::createMenues()
{
    //Creating the menu
    fileMenu = new QMenu("&File", this);
    menuBar()->addMenu(fileMenu);

    fileMenu->addAction(newfile);
    fileMenu->addAction(openfile);
    fileMenu->addSeparator();
    fileMenu->addAction(quit);


    //Edit menu
    editMenu = new QMenu("&Edit");
    menuBar()->addMenu(editMenu);


    //Tools Menu
    toolsMenu = new QMenu("&Tools");
    menuBar()->addMenu(toolsMenu);
    auto selectMenu = toolsMenu->addMenu("Select");
    selectMenu->addAction(selectRow);
    selectMenu->addAction(selectColumn);


    //options
    optionsMenu = new QMenu("&Options");
    menuBar()->addMenu(optionsMenu);
    optionsMenu->addAction(showGrid);

    //help
    helpMenu = new QMenu("&Help");
    helpMenu->addAction(about);
    menuBar()->addMenu(helpMenu);

}
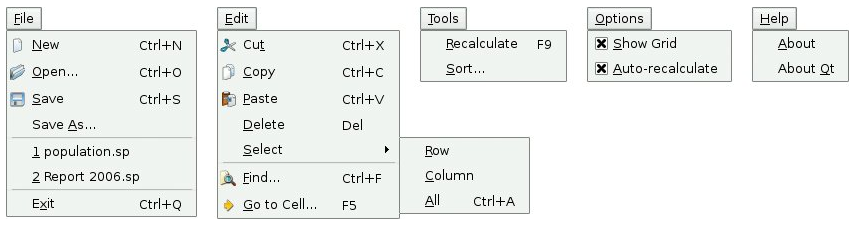
You should be able to see the following menus:

Toolbar
a toolbar provides a movable panel that contains a set of controls. Those controls are generally shortcut for the most used actions.
In order to add a toolbar for our application, we firstly add the <QToolBar>
header. Then similar to a menu, we follow the same philosophy:
-
Adding a toolbar by a given name:
auto *toolbar = addToolBar("name"); // - Adding a set of actions to the toolbar
toolbar->addAction(action*) - Also, we can add a separator:
toolbar->addSeparator();
For our application, we will add main toolbar with the following actions:
void MainWindow::createToolBars()
{
    toolbar = addToolBar("tr(&Main toolbar)");
    //adding the actions
    toolbar->addAction(newfile);
    toolbar->addAction(openfile);

    toolbar->addSeparator(); // Adding a separator

    toolbar->addAction(quit);
}
Your application should look like this:

Setting up the status bar
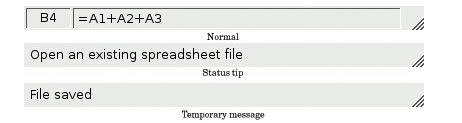
The QStatusBar provides a horizontal bar suitable for presenting status information. A status message could be one of the following categories:
- Temporary: briefly occupies most of the status bar. This is used to explain tooltip text and entires.
- Normal: occupies part of the status bar and may be
hiddenby temporary messages. For example, the information of page number in word. - Permanant: is never
hidden. Used for imporetant mode indications.
In Qt each QMainWindow has a function statusBar() that return a pointer
to the current status bar. We can use the status to either:
- Add normal widgets using the
addWidget(QWidget *w, int stretch) - Add permanent widget using:
addPermanentWidget(QWidget *w, int stretch) - Show temporary messages using:
showMessage(QString message, int duration)
For our application, we will create two permanent QLabels to hold the current cell and current Formula.
We will add the following members to our header:
QLabel *cellLocation;       //label on the status bar for the cell location
QLabel *cellFormula;        // label for the current formula
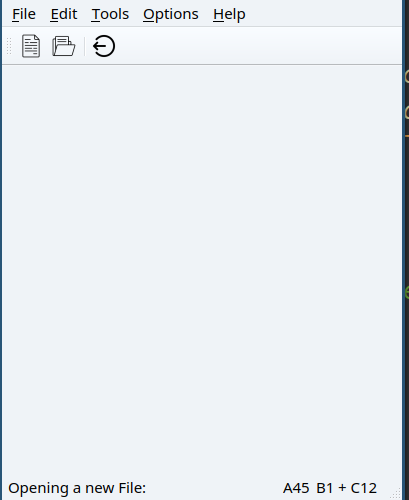
And here is the function to fill those labels:
void creatStatusBar()
{
    //Creating the labels
    cellLocation = new QLabel("A45");
    cellFormula = new QLabel("B1 + C12");

    //Adding the labels to the current status bar
    statusBar()->addPermanentWidget(cellLocation);
    statusBar()->addPermanentWidget(cellFormula);

    //Just for use proposes: showing a temporary message
    statusBar()->showMessage("Opening a new file", 2000);
}
Central Widget
For the final touch on our application. A QMainWindow has to define a central Widget that represent its core functionality. Using polymorphism, we could put any class that inherit from QWidget. Hence the content for this slot varies from a simple widget to a complicated one with a deep hierarchy.
For our SpreadSheet case, we only need a simple widget which is QTableWidget.
Here the code to add in the constructor:
//main widget
spread = new QTableWidget;

//Setting the number of rows and columns
spread->setRowCount(20);
spread->setColumnCount(6);

//Setting the spread as a central widget of our application
setCentralWidget(spread);
Congratulation you have now a graphically complete application (without functionality). That should be fixed in the next lecture where we will connect each action to a given dialog.
Wrap up
In the lecture, we presented the essence of an application in QT. We show
that in order to create such an application, we need to inherit from the
QMainWindow class. Once it is created we need to need to define its
actions. Those actions could be grouped either in a menu or in a
toolbar for quick access. Finally we showed how to present temporary
messages about the state of the application in the statusbar.