Painting with QPainter
learn how to draw objects and shapes using differnt styles and transformations
Qt’s 2D graphics is based on the QPainter class. QPainter can draw geometric shapes (points, lines, rectangles, ellipses, arcs and cords …) as well as pixmap, images and text. Furthermore, QPainter support advanced features such as anti aliasing (for text and shapes in edges), alpha blending, gradient filling, and vector paths. QPainter also support transformations, which makes it possible to draw resolution-independent 2D graphics.
QPainter can be used to draw on a paint device, such as a QWidget, a
QPixMap, or QImage. Using polymorphism, this will come in handy, if you
create your custom widgets. QPainter can also be used in conjunction with
QPrinter for printing and generating PDFs. This means that we can
often use the same code to display data on screen and to produce printed
reports.
An alternative to QPainter is the standard library openGL. The
QtOpenGLmodules makes it very easy to integrate OpenGL code into Qt applictions.
Painting with QPainter
To start painting to a paint device ( typically a QWidget), we
simply create a QPainter and we pass a pointer to the device. For example:
void MyWidget::paintEvent(QPaintEvent *event)
{
   QPainter painter(this);
   ...

}
Let’s illustrate this mechanism to draw a set of lines in a widget.
Create a Widget based project and add the following protected functions.
protected:
void paintEvent(QPaintEvent *e) override;  //classical now
void drawLines(QPainter *e);   //fonction to draw the lines
Here is the implementation of the overridden function
void Widget::paintEvent(QPaintEvent *e)
{
    //Setting a QPainter on the current widget
     auto painter = new QPainter(this);

     //Instruct the painter to draw the lines
     drawLines(painter);
}
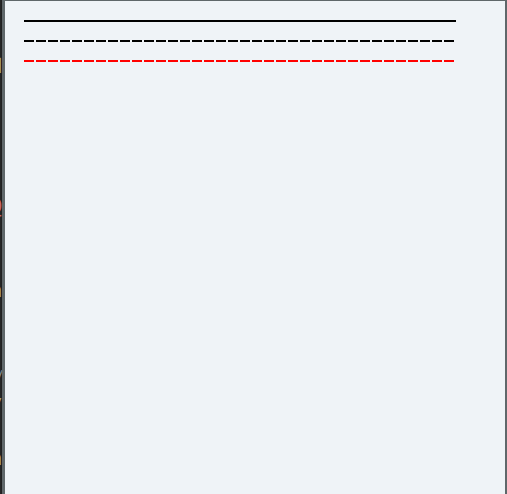
And now for the function to draw the lines:
void Widget::drawLines(QPainter *P)
{
    //Setting the pen (color, pen width, pen style)
    QPen pen(Qt::black, 2, Qt::SolidLine);
    P->setPen(pen);

    P->drawLine(20, 20, 450, 20);


    //Now we will change the pen style
    pen.setStyle(Qt::DashLine);
    P->setPen(pen);
    P->drawLine(20, 40, 450, 40);


    //Now we will change the color
    pen.setColor(Qt::red);
    P->setPen(pen);
    P->drawLine(20, 60, 450, 60);
}
This will produce the following picture:
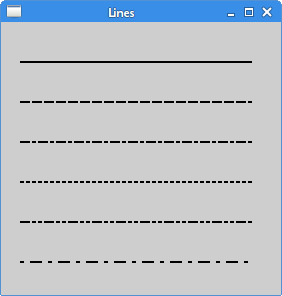
Change the code, to produce the first picture in zetcode tutorial:
We could draw various shapes using QPainter functions. Here is a figure
showing the most used ones:
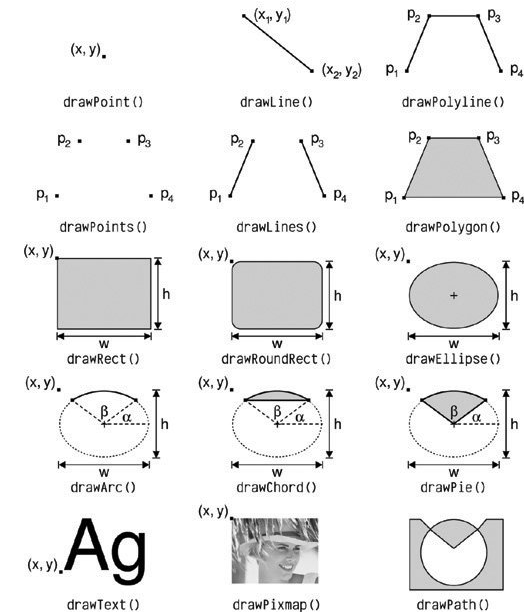
Try to get you hand on those function by drawing the following shapes:
-
Second example in zetcode page:
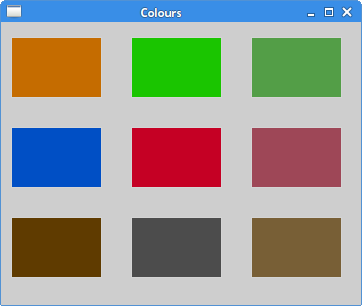 Rectangles with colours
 -
Growing rectangles with a
forloop: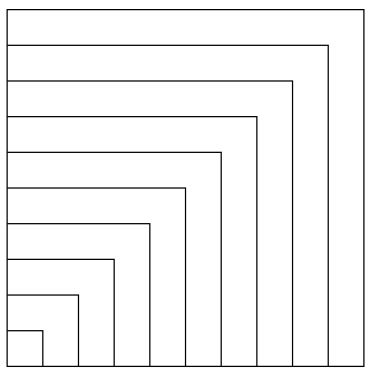 Growing rectangles.
The properties of the QPainter are controlled by a
-
QPen: controls the drawing properties.
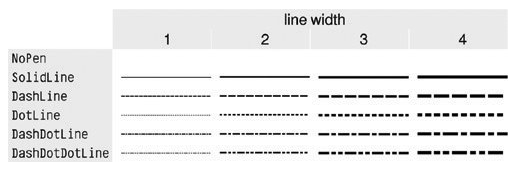 List of pen styles.
 -
QBrush: controls th e fill pattern.
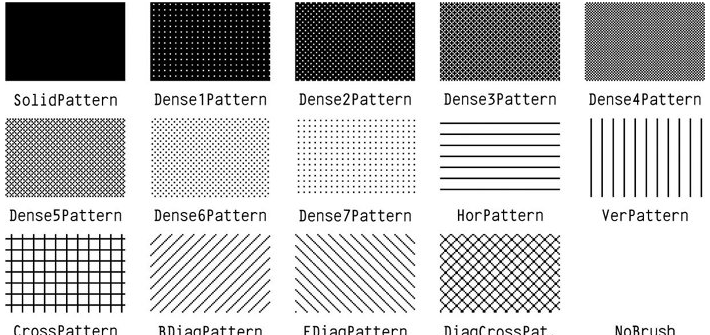 Brushes styles.
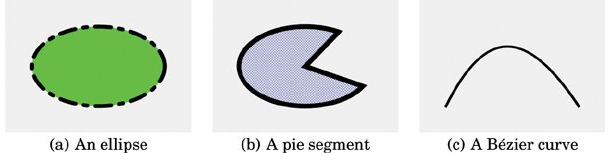
Let’s see a few examples in practice. Let’s try to produce the following picture:
-
Let’s start with example (a):
painter->setRenderHint(QPainter::Antialiasing, true); // antialiasing painter->setPen(QPen(Qt::black, 12, Qt::DashDotLine )); // pen painter->setBrush(QBrush(Qt::green, Qt::SolidPattern)); // brush painter->drawEllipse(80, 80, 400, 240); // drawing the ellipse - Now for the second part (b):
painter->setPen(QPen(Qt::black, 15, Qt::SolidLine, Qt::RoundCap, Qt::MiterJoin)); // a little advanced choosing a cap painter->setBrush(QBrush(Qt::blue, Qt::DiagCrossPattern)); painter->drawPie(80 + 500, 80 , 400, 240, 60 * 16, 270 * 16); - Finally for the last part (c):
QPainterPath path; //Creating a path of points
path.moveTo(80, 320); // moving the first points
path.cubicTo(200, 80, 320, 80, 480, 320);
painter.setPen(QPen(Qt::black, 8));
painter.drawPath(path)
The
QPainterPathclass can specify arbitrary vector shapes by connecting basic graphical elements together: straight lines, ellipses, polygons, arcs, quadratic and cubic Bézier curves, and other painter paths. Painter paths are the ultimate drawing primitive in the sense that any shape or combination of shapes can be expressed as a path.
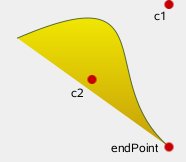
Here is a second example from the documentation
QPainterPath myPath;
myPath.cubicTo(c1, c2, endPoint); //Besier curve from starting point to end pint
...
painter.drawPath(myPath);
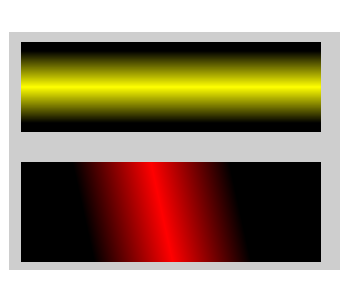
Gradients
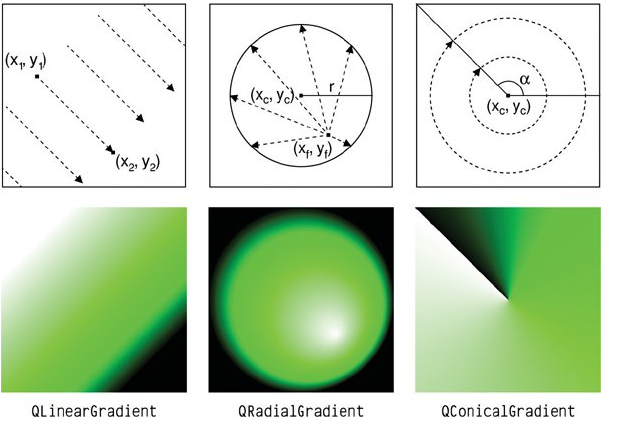
Qt supports three types of gradients:
- linear
- radial
- conical
-
For linear gradient, we specify two controls points and a series of
colorson the line that connects these two points. For example the linear gradient in the previous figure is created using the following code:QLinearGradient gradient(50, 100, 300, 350); // gradient between (50,100) and (300, 350) gradient.setColorAt(0.0, Qt::white); //color at 0 gradient.setColorAt(0.2, Qt::green); //color at 0.2 gradient.setColorAt(1.0, Qt::black); //color at end //filling a region using the declared gradient painter.fillRect(20, 20, 300, 90, gradient); -
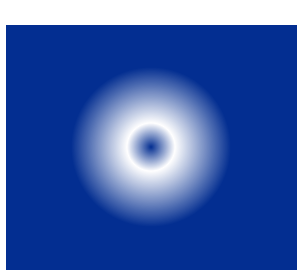
Radial gradients are defined by a center (x_c, y_c) a radius r and a focal point.
-
Conical gradients are defined by a center (x_c, y_c) and an angle a. The colors spread around the center point like the sweep of a
watch.
In order to understand those gradients try to produce the following figures: