Qt Signals and Layouts
Learn the signals mecanisms and layout prime.
The goal of this chapter is combine basic C++ with some basic QT functionality to create a few Graphical User Interface(GUI) applications. We will introduce two QT key concepts which are:
First application
Hello QT
As customary in each programming language, we will write a simple Qt program to
show the Hello Wolrd message in graphical way:
We will present the full program, and then analyze it line by line:
#include <QApplication>
#inlcude <QLabel>

int main(int argc, char* argv[])
{

    QApplication app(argc, argv);

    QLabel * label = new  QLabel("Hello World!");
    label->show();

    return app.exec();
}
#include<QApplication>include the definition of the QApplication which necessary to run an application with an infinite loop to listen to all the events.By now we call them (listen, and event) but our jargon will change in the next chapter.
-
#include<Qlabel>: header to include the QLabel class which represents widget with a given text. - The line
QLabel *label = new QLabel(text)will create a label in the current application. By default this label will be hidden. So we need to make it visible by the functionlabel->show().

Since the content of QLabel is a QString, we can make the label more
interesting by using HTML formating.
- We will add some formating to the text.
- We will also change the size of the font.
QLabel *label = new QLabel("<h2> <i>Hello</i> <font color="red"> World!</h2>")

label->setFont(QFont("times", 18));

Making Connections
Our application is quite basic and doesn’t offer any functionality to the user.
We will first make a simple connexion in order to close the program once the
user click a quite button. We will keep the label, and we will add a new
Widget called QPushButton. We will connect this button to the operation
of exiting the applicatin.
#include <QApplication>
#include <QPushButton>

int main(int argc, char *argv[])
{
    QApplication a(argc, argv);


    //The button
    QPushButton *button = new QPushButton("Quit");
    button->show();

    //New line to connect the button with the exit command
    QObject::connect(button, &QPushButton::clicked, qApp, &QApplication::exit);


    return a.exec();
}

The concept of QOBJECT::connect is to connect a signal which emited by
widget in our case the QPushButton to a function (slot) to respond to the
signal.
Try these examples, but try to put the label and the button in the same window!!.
Layouts
If you tried the previous exercice, you will remark that you only can see one object. This is due to the need of mecanism to compute the location of each objects (otherwise one object will be put above the rest like a stack).
In Qt this mecanism is called a Layout manager. It is main use is to automate
the concept of adding new widgets to its current one. We will also dive a little
deeper into signals and slots in order to connect two widets.
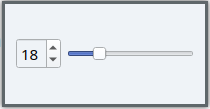
So let’s imagine, that we want an application that ask the user of its age. The user could enter his age either by:
- Entering a text in a Box.
- Sliding a bar.
Here is the full program:
#include <QApplication>
#include <QPushButton>
#include <QWidget>
#include <QSpinBox>
#include <QSlider>
#include <QHBoxLayout>

int main(int argc, char *argv[])
{
    QApplication a(argc, argv);

    //Creating the window
    QWidget *window = new QWidget();
    window->setWindowTitle("Enter your age: ");
    window->resize(200, 100);


    //Creating the box manager (Horizontal Box layout)
    QHBoxLayout *layout = new QHBoxLayout(window);

    // Creating the spinxob
    QSpinBox * spin = new QSpinBox;
    spin->setRange(0, 80);
    layout->addWidget(spin);


    //Adding the slider
    QSlider *slider = new QSlider(Qt::Horizontal);
    layout->addWidget(slider);
    slider->setRange(0, 80);

    //making the connexion
    QObject::connect(spin, SIGNAL(valueChanged(int)), slider, SLOT(setValue(int)));
    QObject::connect(slider, SIGNAL(valueChanged(int)), spin, SLOT(setValue(int)));
    spin->setValue(18);

    window->show();
    return a.exec();
}
The intersting line is QHBoxLayout is a Layout Manager to place items in a Horizontal way. Other intersting layouts are:
QVBoxLayou: lays out widgets vertically from top to bottom.QGridLayout: lays out widgets in a grid.QFormLayout: lays out widges in a form.
the line QHBoxLayou(window) create a horizontal layout manager and make it
responsable for managing the layout of the window.
Another method to make layout manager responsible for a widget is to create them indepently and then use a setter.
// creating the windoow
QWidget *window = new QWidget;

// Creating the layout manager
QHBoxLayout *layout = new QHBoxLayout;

// making the default layout for window
window->setLayout(layout);
Absolute Positioning
A programmer could also use Absolute Position (not recommened) where he
explicitly the position and the size of each widget. When using this technique,
one has to understand several points:
- The size of the widgets do not adapts if we resize the main window.
- Application looks different (Poorly distributed) in differnt screen.
- Changing the font or the size may spoil the layout.
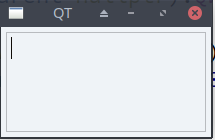
Let’s illustrate this concept by creating a simple widget using the absolute
Positioning with the method setGeometry.
We will also use Inheritance to create our custom widget.
//Sub classing Widget
class Absolute  : public QWidget
{

public:
    Absolute(QWidget *parent=nullptr):QWidget(parent)
    {
        auto *edit = new QTextEdit(this);
        edit->setGeometry(5, 5, 200, 100);
    }
};

int main(int argc, char *argv[])
{
    QApplication a(argc, argv);


    //Creating a widget
    Absolute *Abs = new Absolute;
    Abs->show();

    return a.exec();
}
The problem with this concept is that the widget TextEdit will keep a
fixed shape even after we resize the image:
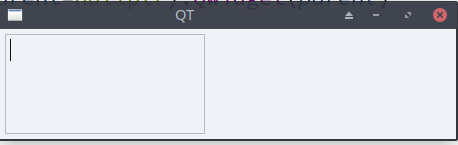
This approach is absoletly discouraged
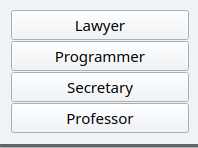
VBox Layout
A VBoxLayout lays out widgets
vertically from top to bottom. We could control the spacing between
the widgets using a setter setSpacing(int).
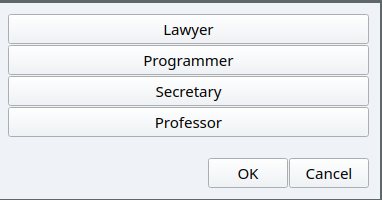
Let consider a simple example where we store the types of our employees in a file, and we want to create a button for each class.
For example let’s consider the file employees.txt with the following content:
Laywer
Programmer
Secretary
Professor
we want to create a program to read this file, and create a button for each class. The button will be distributed vertically.
First we will create our custom Button using inheritance.
class CustomButton : public QPushButton
{
public:
    CustomButton(QString name, QWidget *parent=nullptr):QPushButton(name, parent)
    {
        //change expanding default
        setSizePolicy(QSizePolicy::Expanding, QSizePolicy::Fixed);
    }
};
Basically, what we did here is to create a button with expanding functionality in both widht and height.
By default button, expand horizontally but have fixed size vertically.
Now, we will create the program to read the content from the file and lay them
vertically using QVBoxLayout.
    QApplication a(argc, argv);

    //reading the file
    QVBoxLayout *layout = new QVBoxLayout;
    //Set the spacing between widgets.
    layout->setSpacing(2);

    //Creating the window
    QWidget *window = new QWidget;
    window->setWindowTitle("Employees");
    window->setLayout(layout);

    //reading the file
    std::ifstream  In("path to employees");
    std::string line;


    // Loop to create a button for each line
    while(std::getline(In, line))
    {
        CustomButton *button = new CustomButton(QString::fromStdString(line));
        layout->addWidget(button);
    }

    //Closing the file and present the final window
    In.close();
    window->show();
    return a.exec();
Nested Layouts
Suppose now that we want to add the classical Ok/cancal buttons. Those buttons
should be placed horizontally!

In order to achieve this, we will use
- A main layout to lays widgets vertically.
- A child layout to lays the employees vertically.
- A second child layout to lays the buttons horizontally.
QApplication a(argc, argv);


//main Vertical layout
QVBoxLayout *mainLayout = new QVBoxLayout;
mainLayout->setSpacing(1);


//two child layouts
auto childLayout1 = new QVBoxLayout;
auto childLayout2 = new QHBoxLayout;

//Creating the window
QWidget *window = new QWidget;
window->setWindowTitle("Employees");
window->setLayout(mainLayout);

//reading the file
std::ifstream  In("path to employees files");
std::string line;

//contructing the first part
while(std::getline(In, line))
{
    CustomButton *button = new CustomButton(QString::fromStdString(line));
    childLayout1->addWidget(button);
}

//Creating the second part
childLayout2->addSpacerItem(new QSpacerItem(200, 20, QSizePolicy::Expanding));
childLayout2->addWidget(new QPushButton("OK"));
childLayout2->addWidget(new QPushButton("Cancel"));


//adding the child layouts
mainLayout->addLayout(childLayout1);
mainLayout->addSpacerItem(new QSpacerItem(200, 20));
mainLayout->addLayout(childLayout2);


//Cleaning
In.close();
window->show();
return a.exec();
Grid Layouts
A QFormLayout is a simple layout to lays out widgets in a form like. Generally a two columns layout with widgets and their labels. The left column consists of the label of each widget and the right one hosts the widgets.
In order to illustrate this layout, we will create a widget to ask a student for his:
- Name
- Age
The list coulds goes on but we will limits ourselves to those three for the sake of simplicity.
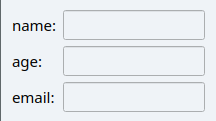
In order to create a Form Layout, we will use the class:
QFormLayout *layout = new QFormLayout;
We will then set up the default label alignement to right and center.
layout->setLabelAlignement(Qt::AlignRight | Qt::AlignCenter);
Once this is done, we could add a widget and its label using the following syntax:
layout->addRow(string label, Widget *widget);
Here is a complete example to show the widget:
QApplication a(argc, argv);

//Creating the main window
auto *window = new QWidget;
window->setWindowTitle("Student Info");


//Creating the Form layout
auto layout = new QFormLayout;
layout->setAlignment(Qt::AlignRight | Qt::AlignCenter );


//Creeating the widget
auto name = new QLineEdit;
auto age = new QLineEdit;
auto email = new QLineEdit;


//Adding them using the layout
layout->addRow("name:", name);
layout->addRow("age:", age);
layout->addRow("email:", email);

//Setting the layout and show the window
window->setLayout(layout);
window->show();
return a.exec();
Wrap up
In this chapter, we illustrate the mecanism of creating some basic widgets components. We stretch the surface of the connexion mecanism between them using the concept of signal/slots. Finally we present an efficient mecanism (layout) to place those widgets and compute the size.
We missed an important layout which is GridLayout, but you’ll have a chance to play with layout in the lab where you’ll be asked to create a calculator. In the next chapter, we will dive deeper in the the signal slots mecansim.