HSLA Image color space..
Applying inheritance knowledge to manipulate HSLa images
Understanding the HSL Color Space
An image is generally represented by $N\times M \times 3$ tensor where the value of pixel is
represented by the RGB color system. In this system a color
is a linear combination of the three main colors red, green and blue.
In this lab, we will use an alternative color space that represents colors by
human perception of colors.
The HSL color system uses the
Hue, Saturation and Luminance of the color. From the Adobe Techinag
Guide page an brief explanation of each attribute is given as follow:
-
Hue ( denoted
h) define the color itself, for example red in distinction to blue or yellow. The values of the hue axis run from $[0-360]$ beginning and ending with red and running through green, blue and all intermediary colors like greenish-blue, orange, purple, etc.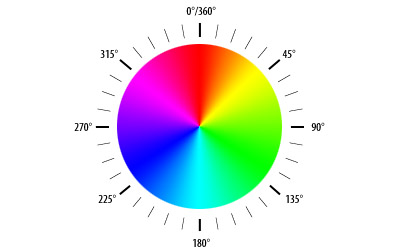 The Hue representation of basic colors.
There are two hues tht we’ll use later in this lab:
- “Illini Orange” has a hue of 11.
- “Illini Blue” has a hue of 216.
-
Saturation (denoted as
s) indicates the degree to which the hue differs from a neutral gray. The values run from $0\%$, which is no color saturation, to $100\%$, which is the fullest saturation of a given hue at a given percentage of illumination. The saturation field in the HSL space.
 - Luminance (denoted as
l) indicates the level of illumination. -
The value values run as pecentenage $0\%$ appears black (no light) while $100/%$ is full illumination.
 The saturation field in the HSL space.
 -
The full HSL color space is a three-dimensional space, but it is not a cube. The area truncates toward the two ends of the luminance axis and is widest in the middle rangel. The ellipsoid reveals several properties of the HSL colro space:
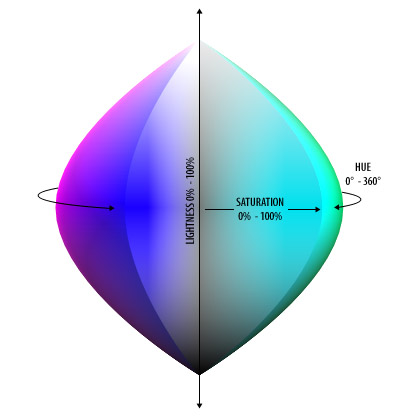 Representation of the HSL color space.
The PNG class
In the image_manip.zip, you are
given a project which contain a class called PNG that implement basic images
maniplation like:
- Reading an image from the system.
- Writing an image into the system.
- Accessing pixels of this image.
Here is a glance for this class header:
class PNG{
    PNG();   //default constructor
    PNG(int, int): //constructor with width and height
    ~PNG();         //Destructor
    bool readFromFile(string);  //read from a file
    bool writeToFile(string);  //write content to a file
    HSLAPixel  getPixel(int x, int y); //get content for pixel x, y

};
Inhertance diagram
Your goal is to write additional classes that inherit from this class and implement addtional functionalities.
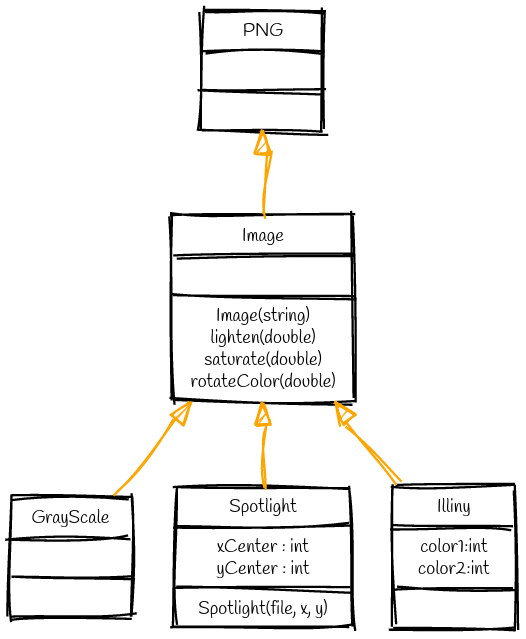
Image
Create a class named Image that inherits from the PNG class. This means
that your class will inherits all the attributes and members from the PNG
class. Meaning that anything you can do with a PNG you can do with an Image.
Addionally, you should add the following methods:
-
Image(string filename): a special constructor that loads the image from the givenfilename. -
lighten(double amount)changes the luminance of each pixel by amount.- The function must ensures that luminance remains in the range [0,1]
- Here is an example how you could loop on the image pixels:
  for(unsigned x = 0; x < width() ; x++)
  for(unsigned y = 0; y < height(); y++)
  {
     //reference on the pixel
     HSPAPixel &P = getPixel(x, y);

     //modifiy the element of P
  }
saturatechanges the luminance by amount.- Again you should verify that the luminance stays in [0,1].
rotateColor(double angle): add the value of angle to each pixel.- The value of a color is in cyclic value [0,360].
Before you continue on the other classes, make sure you pass all the tests for this class.
Grayscale
Now you should write a simple class Grayscale that inherits from the Image
class. This is a simple class that eliminates all the colors and represents the
image using only a grayscale level.
Illini
Create a class called Illini that inherits from the Image class. An Illini
iamge has only two colors that are defined as attributes.
- color1 = by defaults equals to illini orange = 11 .
- color2 = by defaults equals to illini blue = 216.
The class has a constructor that accepts those two colors.
Illini(string filename, int color1, int color2);
The constructor must replace the hue of each pixel that are either the first
or the second color. The choice is based on the closest color. Remember hue
values are a circle!.
Start your code with static colors, where
color1=11andcolor2=216. You’ll be able to pass all the tests. Once you’ve completed this task and if you’re feeling the challenge, adapt your code to a more general setup.
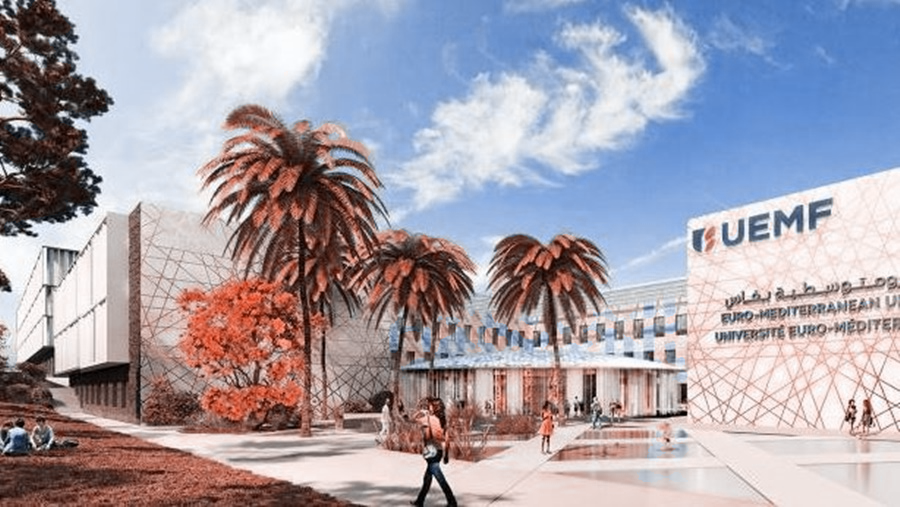
Spotlight
A Spotlight image create a spotlight centered at a given point centerX,
centerY defined as attributes.
A spotlight adjusts the luminance of a pixel based on the Euclidean distance the pixel is away from the center by decreasing the luminance by 0.5% per 1 pixel, up to 80% derease of luminance.
For example, a pixel that is far away from the center by 3 pixels above and 4 pixiels to the right will have a total of $\sqrt{3^2 + 4^2} = \sqrt{25}=5$ pixels away and its luminance is decreased by 2.5% (0.975x its original value). At a distance over 160 pixels away, the luminance will always be decreased by 80% (0.2x its orignal value).
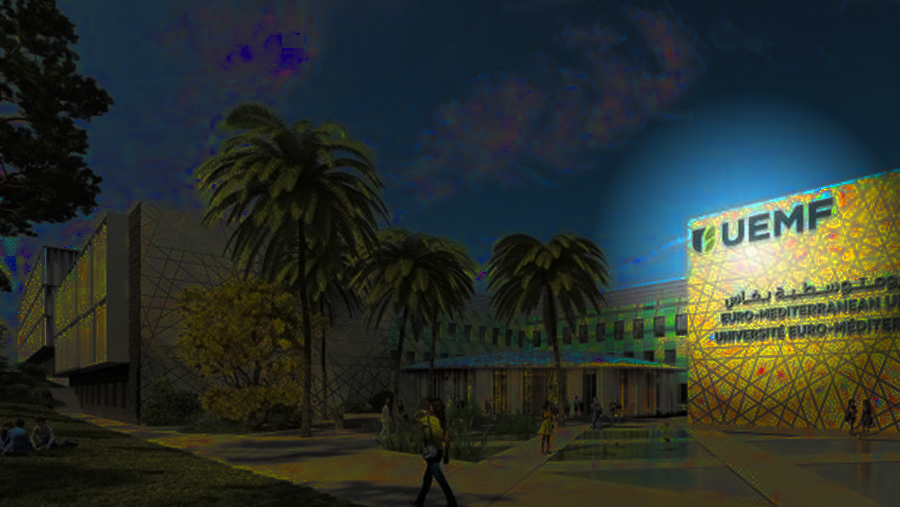
After completing the all the tests, add a method
void changeSpotPoint(int centerX, int centerY)
That changes the position of the spotlight.
Try to place your favorite image in the
resfolder and try to reprodue an image of each effect you saw in the lab.